Rooting an Echo Plus 2 with AI
Today's AI models hold a conversation, use tools, and handle the kind of open-ended requests that older voice assistants reduced to a handful of fixed commands. Amazon sells its own version of this now, Alexa+. But I wanted to choose the model myself, wire it into my Home Assistant setup, and decide where my data goes, all while still using the speakers and microphones I already owned.
As more of my home automation moved to Home Assistant, Alexa started to feel like the odd one out. I tried a Home Assistant Voice Preview Edition: I loved that it was open, but I missed how my Echos sounded. Then I rooted an Echo Show 5, put Kiosk Satellite on it, and finally had a voice assistant I actually enjoyed using. Which raised the obvious question: could I do the same to another Echo?
I picked the Echo Plus 2. It was the oldest Echo I owned, which made it the best bet for known vulnerabilities, and it happened to sound great. I wasn't starting from scratch, either: EchoCLI, firebreak, the LineageOS work, and echo-dot-assist had already mapped a lot of the terrain on related devices. None of it dropped straight onto my Plus 2, though. Two questions were still open. Could I run my own code on this thing, and how much of the work could I hand to an AI?
This post follows the answer to both, worked out together with Codex, OpenAI's coding agent, running their GPT-6 Sol model. The short version: we ended up with root that comes back on its own after a normal cold boot. If you want to reproduce it, the code and a step-by-step guide are in the project repository.
Where could my code run?
Work on related Echos suggested this one ran an Android-derived system too, and the hardware pointed at a MediaTek chip, which made a pile of existing MediaTek exploits worth a look. On an Android device, control comes in layers. An ordinary app lives inside a sandbox. The Linux kernel enforces that sandbox and owns the hardware. And code in an early boot stage can decide what loads before Android even exists. The earlier you sit in that chain, the more power you have, but those early stages are also small, with far fewer ways in.
Figure 1 is the startup path I used as a map. The arrows show what normally runs next; the labels say what each stage is for, before any exploit enters the picture.
 +--------------------------+
 | BootROM                  |  Fixed instructions in the chip
 +--------------------------+
              |
              v
 +--------------------------+
 | Preloader                |  Prepare memory and board hardware
 +--------------------------+
              |
              v
 +--------------------------+
 | Little Kernel (LK)       |  Select and check the boot image
 +--------------------------+
              |
              v
 +--------------------------+
 | Boot image               |  Supply the kernel and initial file system
 +--------------------------+
              |
              v
 +--------------------------+
 | Linux kernel and Android |  Enforce app sandboxes and start services
 +--------------------------+
              |
              v
 +--------------------------+
 | Installed apps           |  Run with ordinary app privileges
 +--------------------------+
Figure 1. The normal startup path and the job of each stage.
Each of these stages earns its place. The BootROM gives the chip a fixed starting point and a door into a low-level recovery mode. MediaTek can't know every board's memory, clocks, and peripherals at manufacture time, so the preloader brings up this particular board. LK can pick between boot slots, which lets an update stage a new image while keeping a fallback. And the boot image carries the Linux kernel and the initial file system Android needs to come up.
The checks between these stages form a Secure Boot chain: each verifier decides whether the next image is allowed to run. Android's Verified Boot documentation explains the model, and I later confirmed that this Plus 2's LK does reject an altered boot image. But my first goal was smaller than breaking that chain: run my own code, learn how the device starts, and get enough control to use its microphone, buttons, and network on my terms. Kernel-level control would cover most of that.
Getting initial code execution
Previous MediaTek BootROM research had already produced the tools I'd need. Codex helped me pin this chip down as a promising target. The one thing standing between me and those tools was a USB data connection to the chip. Teardowns of other Echos versions made an exposed interface plausible.
Six small contacts sit on the underside of the assembled Echo Plus 2. You don't have to open the enclosure to reach them. I opened mine anyway, to inspect the traces and take measurements, then soldered a connection for stable debugging. I checked ground and the suspected USB lines with a multimeter and talked the readings over with Codex. My cable used TM4 for USB D+ (green lead), TM5 for USB D− (white lead), and TM37 for ground (blue lead). Spring-loaded pogo pins can reach the same exterior contacts. Figure 2 shows the mapping I used.
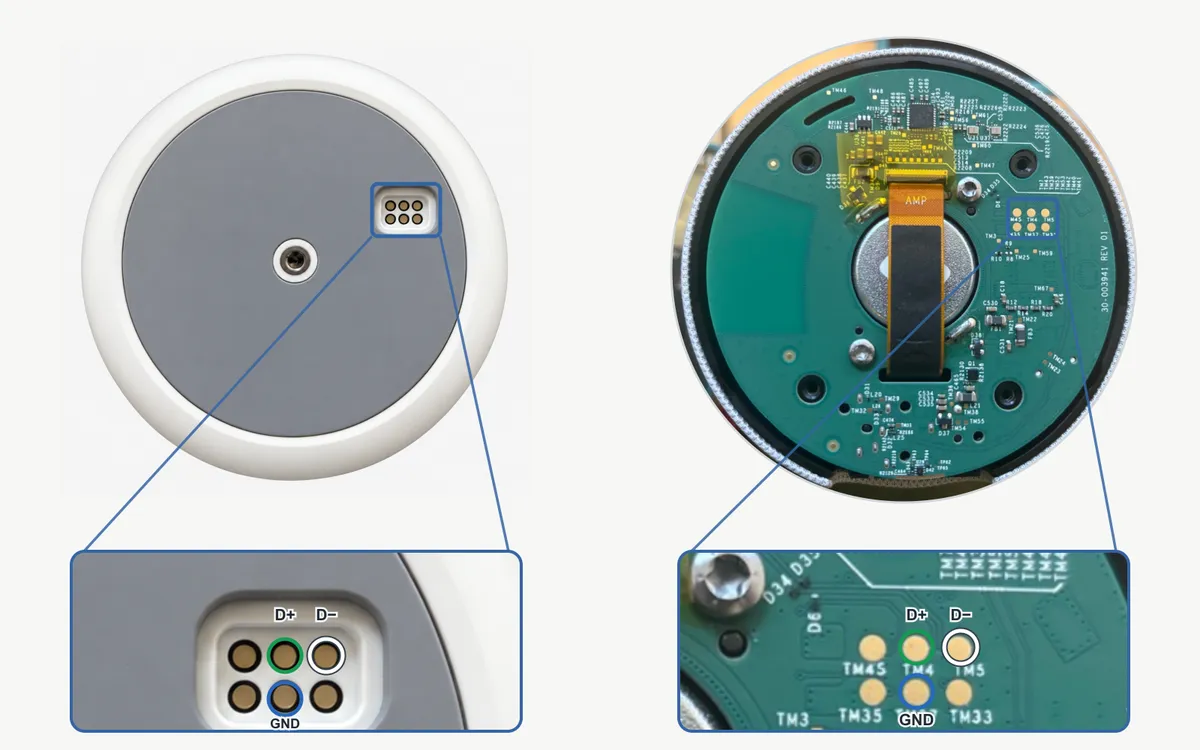
Figure 2. The exterior contacts and their corresponding pads on the opened board.
Holding the Action button while applying power brought the Plus 2 up over USB in BootROM mode. MTKClient reported hardware code 0x8167, and its Kamakiri method worked on my unit out of the box. The first thing I ran was a read-only identification command, with power applied while holding Action:
"$HOME/mtkclient/.venv/bin/python" "$HOME/mtkclient/mtk.py" gettargetconfig --skipwdt
R0rt1z2's write-up explains Kamakiri in detail. The exploit researchers and the MTKClient maintainers did the foundational work here. Our reproduction guide pins the exact tool version and lists the prep commands.
Kamakiri handed me control at the very first box in Figure 1. Powerful but temporary, and just as usefully, it let me look instead of guess. A separate read-only session captured the storage layout and the boot images. The two partition tables both checked out and showed an active A slot, a spare B slot, and a shared /data partition. Figure 3 maps it.
 slot A   boot_a    system_a   <- active on the measured boot
 slot B   boot_b    system_b   <- available for an update or fallback
 shared   /data                <- installed apps and their data
Figure 3. A simplified map of storage measured on my Plus 2.
What I actually wanted was to run an Android voice app on the original audio hardware. That meant letting Android finish booting while holding on to enough control to install apps, and a bare BootROM entry point doesn't give you that.
So I asked Codex to build the bridge. It sounds like one step. It isn't: the payload has to keep the stock boot sequence intact across several stages, then change what happens after LK has already checked the boot image. Codex staged a copy of the stock preloader in RAM, rewrote LK's final handoff, and slipped in a temporary initial-file-system overlay. That overlay brought up a root-capable USB ADB service while stock Android kept booting around it. We watched the whole thing come up in layers: boot milestones, ADB identity and capabilities, Android's Package Manager, and finally Alexa answering. At that point I could install an app the normal way, through Android's package installer. Its code landed in /data, where Android expects apps to live, and the signed boot images were never touched.
Most of that bridge was Codex's engineering, not mine. My contribution was almost embarrassingly physical: I taped the Action button down and plugged the Echo into a smart plug I could toggle from anywhere. That was enough to close the loop. Codex could now flash a payload, cycle the power, inspect what booted, rewrite the payload, and go again, over and over, without me touching the bench. It ground through failure after failure overnight and had Android and a root ADB shell up by the time I woke. Pulling a device-specific preloader, a patched LK handoff, a temporary file system, and a working Android session into one payload is serious low-level work, and I couldn't have built and tested it myself in anything like the time. A $20 smart plug is what turned an experiment that needed me at the bench into one the agent could run while I slept.
With the bridge live, I could finally ask the running system what it was. These read-only ADB commands gave me the details:
adb -d shell getprop ro.build.fingerprint
adb -d shell getprop ro.build.version.security_patch
adb -d shell uname -r
adb -d shell uname -v
The Plus 2 reported Fire OS 6.5.7.5 (NS6575/8338), fingerprint Amazon/lidar/lidar:6.0/NS6575/8338N:user/amz-p,release-keys, a security patch property of 2026-03-01, and kernel 4.4.22+ built on 14 October 2026. I only learned any of this after the bridge worked. None of it was an assumption going in.
The same read-only session also dumped storage and the boot images, which handed us this unit's actual kernel for offline analysis. From here on, Codex could test a candidate bug against the exact code the Plus 2 would run before ever putting another payload on the device.
Making the access survive a reboot
With the RAM bridge running, I installed Kiosk Satellite. Its microphone and speaker worked straight away over Home Assistant's voice path, on the stock Android audio stack. Kiosk itself is just an ordinary app; root is what let us hang on to microphone access after Fire OS tried to revoke it, drive the physical buttons and LED ring, and poke at stock services. Then I cut power, and exactly as expected, the BootROM payload and every temporary boot change vanished. Re-running a physical exploit after every restart is no way to live with a speaker you use every day.
The textbook answer would be to find a bug in an earlier boot stage and smuggle a modified image past the signature checks. Codex traced LK and ran bounded RAM probes, but the promising bugs never led to a path you could actually reach on an ordinary cold boot. So I redirected the search. Android had already accepted the app I installed through the bridge, and unlike a modified boot image, an installed app in /data simply survives a reboot.
I ran the bridge once more and installed a small research APK with a helper binary at /data/x. The APK registered a LOCKED_BOOT_COMPLETED receiver, so stock Android started it on every normal cold boot, no USB exploit required. Secure Boot still verified the boot images. The Package Manager just loaded our signed app from /data into its usual sandbox. The bridge was only ever needed to get the app installed on a locked device. After that, I had code execution on every cold boot, at first with nothing but ordinary app privileges.
Which left the real question: could that sandboxed app reach the kernel? Linux and Android kernel bugs are the classic route out of a sandbox, so I asked Codex to hunt for one reachable from an unprivileged app on this old kernel, and to check every candidate against the image we'd captured. One stood out: the Binder use-after-free Google Project Zero analyzed in 2019, CVE-2019-2215. An October 2026 build still carrying a 2019 bug sounded far-fetched. We treated the static match as a lead, nothing more, and went to test it on the live device.
The Binder lifetime bug
Binder is how one Android process asks another to do work. Picture an app asking a system service to change the volume. The calling thread can wait for the reply, and to make that possible the kernel gives it a wait queue. Separately, Linux epoll lets an app watch several event sources at once; when it watches Binder here, it holds a pointer straight to that wait queue (Figure 4).
 app process                         kernel

 request to service  ----------->  Binder thread record
                                        |
                                        +-- wait queue
                                               ^
                                               |
                          epoll watch ----------+
Figure 4. The Binder thread's wait queue and the epoll watch.
A pointer is only safe while the thing it points at still exists. When the Binder thread exits, the driver frees its record, and the wait queue inside it. The right order is to tell epoll to let go of its pointer first; the Android fix does exactly that, with a POLLFREE notification. Skip it, and epoll is left holding a pointer into memory that now belongs to something else entirely. That's the use-after-free. Figure 5 puts the right order and this build's broken one side by side.
 intended    notify epoll -> remove its pointer -> free Binder thread

 Plus 2      free Binder thread -> epoll still points into old memory
                                          |
                         another allocation can occupy those bytes
                                          |
                         epoll cleanup treats them as a Binder queue
Figure 5. The lifetime rule and the missing cleanup on this build.
The missing piece is tiny. Here's the Android fix, boiled down to the lines that matter:
if ((thread->looper & BINDER_LOOPER_STATE_POLL) &&
    waitqueue_active(&thread->wait))
    wake_up_poll(&thread->wait, POLLHUP | POLLFREE);
/* The thread and its wait queue can now be freed. */
Codex followed BINDER_THREAD_EXIT through the saved Plus 2 kernel and found no equivalent notification before the free. Then the app put the lifetime rule to the test on real hardware. The trigger leaves a Binder request pending for a service in another process; on this Binder version, that pending request is what makes epoll latch onto the short-lived thread queue instead of a longer-lived process queue. That detail is the whole ballgame. (EPOLLIN just means "wake me when this source has something to read.")
/* A Binder request is waiting for another process to reply. */
struct epoll_event event = {.events = EPOLLIN};
epoll_ctl(epfd, EPOLL_CTL_ADD, binder_fd, &event); // epoll saves queue pointer
ioctl(binder_fd, BINDER_THREAD_EXIT, 0);            // Binder frees the queue
/* Other kernel data can now occupy the freed block. */
epoll_ctl(epfd, EPOLL_CTL_DEL, binder_fd, NULL);    // stale pointer is used
The ioctl frees the queue; epoll keeps its address anyway. So that last call reaches into whatever moved into the freed memory next. The full source handles the return-value checks and the pending request I've elided here. Codex confirmed the reuse on the actual Plus 2, then set about turning it into a controlled write. Google's Pixel exploit was a map to the root cause, not a program we could run, as its memory layout didn't fit this device.
What can occupy the freed memory?
Freeing an object doesn't wipe its bytes. Linux is free to hand that same block to the next allocation of the right size, and epoll is still pointing into it. When the stale watch is torn down, its cleanup rewrites two pointers of a doubly linked list, and on this layout those writes land at offsets 0x50 and 0x58 inside whatever now occupies the block. So the question became very concrete: what do we want sitting at those two offsets?
Codex started with something harmless and readable: 96-byte messages queued on a local Unix socket. The app could fill one with recognizable bytes, let it take over the freed block, then read it back. Removing the stale epoll watch changed two words near its end. This was never part of the exploit chain, as it was a ruler, a way to see exactly where epoll writes before trying to make that write do anything useful. Here's one captured message (Figure 6):
                              +0x00                +0x50          +0x58
 queued 96-byte message       [ chosen bytes ... ][ 0000000000000000 ][ 0000000000000000 ]
 after epoll cleanup          [ chosen bytes ... ][ ffffffc01ad71050 ][ ffffffc01ad71050 ]

 list-node address q = 0xffffffc01ad71050
 buffer address    P = q - 0x50 = 0xffffffc01ad71000
Figure 6. Two words in a retained message changed after stale epoll cleanup.
The changed words leaked a kernel address and, with the known offset, the base of that one message. Useful for confirmation, but a leak isn't a write. The real chain swaps the message for an object whose fields at 0x50 and 0x58 can bend the kernel into writing somewhere we choose.
Then, redirect a receive operation
That object is the kernel's private copy of an iovec array: the list recvmsg uses when it receives data from a socket. Each entry says two things: where to put bytes, and how much room is there.
struct iovec {
    void  *iov_base;  // where to write received bytes
    size_t iov_len;   // how many bytes fit there
};
Here's the one property everything hinges on: as recvmsg fills entry after entry, it re-reads iov_base and iov_len fresh from memory every time it continues. It just remembers "I'm in entry N, at position X." If that memory changes mid-receive, the kernel keeps going with the new values, and that memory is now ours.
We split the job across two processes of our own app. The child calls recvmsg with a list of perfectly ordinary user-space destinations. The kernel checks them with access_ok, copies the list into kernel memory, and settles in to wait for data, and that copied list is what reuses the freed Binder block. The parent feeds bytes to the waiting child and pulls the stale epoll watch at the right instant. Handing recvmsg a kernel address up front would never survive its check. Editing the already-checked copy, after the check, is the opening. A textbook time-of-check / time-of-use flaw.
The geometry lines up almost too well. Each iovec entry is 16 bytes, so entry 5 starts at 5 × 16 = 0x50: its base at 0x50, its length at 0x58, and entry 6's base right after at 0x60. Those are exactly the fields epoll's cleanup can reach. Figure 7 walks the whole thing byte by byte, with the array placed at an illustrative 0x1000 so the addresses are easy to follow.
 Say the copied iovec array sits at 0x1000. recvmsg has already
 passed its one and only address check -- nobody checks again.

   0x1000  entry[5].base = USER_A   (your buffer, allowed)
   0x1008  entry[5].len  = 24
   0x1010  entry[6].base = USER_B   (your buffer, allowed)

 (1) send 8 bytes       -> USER_A        recvmsg is now 8 bytes into entry[5]

 (2) trigger epoll bug  -> entry[5].base := 0x1000
                           it now points at ITSELF, so from here recvmsg
                           writes straight into the iovec array

 (3) send 16 bytes      -> lands at 0x1000 + 8 = 0x1008, then 0x1010:
                             0x1008  entry[5].len  := 24
                             0x1010  entry[6].base := &selinux_enforcing
                           entry[5] is now "full" (8 + 16 = 24) -> advance to entry[6]

 (4) send 4 bytes       -> &selinux_enforcing      00 00 00 00  -> SELinux off
Figure 7. Two pointer writes we don't control become one write we do.
Walk it slowly, because the trick is subtle. The epoll bug gives us a single kernel write we can't choose the value of, but it points entry[5].base back at itself, and that flips the receive from "write out to my buffer" to "write into my own control table." Step 3's 16 bytes are plain socket data, fully ours; they just happen to land on the iovec metadata, resetting entry 5's length to 24 (so the kernel cleanly moves on) and dropping a real kernel address into entry[6].base, the value access_ok would have rejected on sight. Step 4's final bytes then flow through entry 6 to that address. Two pointers we couldn't choose, combined into one we can.
And that last step is the whole payoff: once entry[6].base holds an address we picked, the bytes we send next get written there, and they're nothing but socket data we type. So what we've really built is a controlled write: chosen bytes at a chosen kernel address. The only cap per shot is entry[6]'s own length field, which decides how many bytes land before the receive moves on; whether that's four bytes or eight is simply the size of the thing we're overwriting, not anything the bug imposes. As a guard, the parent checks that the 16 redirection bytes did not show up in the original user buffer; if they did, the pivot missed and it sends nothing further.
One thing worth stating plainly, because it's easy to wonder about: these are fixed kernel addresses, not values we recompute each boot. This build doesn't randomize its kernel layout (there's no KASLR in the way), so an address read out of the static image is exactly where it sits on the running device, every time. The 50/50 reboot series below is the practical proof: the same two addresses held across every single boot.
Codex pulled those two targets from this unit's captured kernel: selinux_enforcing at 0xffffff8008c301c4, core_pattern at 0xffffff8008b59398. Each needs its own free-and-reuse attempt, and the source carries the timing, the guards, and the checks against each location's original value. A controlled write to two chosen globals is not a general kernel memory editor, but it doesn't need to be, because those two globals are exactly the ones that hand you code execution.
If you know Project Zero's 2019 write-up, this will look familiar and different at the same time. Their PoC leans on iovecs twice: writev to leak a kernel address, then recvmsg to overwrite addr_limit and open up arbitrary read/write across the whole kernel. Ours uses the same recvmsg trick for the write step, but reaches the address a different way and skips addr_limit entirely: it drops values straight into those two specific globals instead. Worth keeping in mind that Google itself notes its PoC isn't necessarily how the in-the-wild exploit worked; it's one route to the bug, and this is another.
Now the two writes themselves. The first, into selinux_enforcing, flips it from 1 to 0. SELinux normally enforces extra rules on what a process may touch or run; zero makes it Permissive, so violations get logged but not blocked. The chain needs that, because the next step runs a helper from /data, outside the trusted system paths.
The second changed core_pattern from core to |/data/x. A core dump is what the kernel collects when a process crashes, and in Linux's documented pipe form a leading | tells the kernel to launch a program and pipe the dump into it. We'd already placed a helper at /data/x. So the app crashed its own child on purpose, and the kernel dutifully started /data/x as UID 0. The helper confirmed its identity and capabilities, then put core_pattern back. Figure 8 traces that chain end to end.
 stock Android starts our /data app
                  |
                  v
 Binder/epoll bug yields checked short writes
                  |
                  +--> SELinux Enforcing: 1 -> 0
                  +--> core_pattern: core -> |/data/x
                                              |
                                      crash our own child
                                              |
                                      kernel runs /data/x as UID 0
Figure 8. The privilege chain after stock Android starts the installed app.
The helper restores core_pattern once it's up, but SELinux stays globally Permissive in the demonstrated chain. That tradeoff is real, and I come back to it below.
Root returns after a cold boot
To test it for real, I started the Echo the boring way: Action button free, no Kamakiri, no RAM payload. Stock Android launched the app, and the app used the Binder bug to pull root back by itself. In two documented power-cycle tests I left it off for at least 30 seconds before letting it boot with no host attached. The helper returned UID 0 and full capabilities each time. The second of those followed a factory reset and a clean reinstall of the exploit app. I also unplugged USB for a separate power cycle and watched WiFi ADB and the Home Assistant voice setup come back on their own.
Across 50 consecutive stock software reboots, a UID-0 command landed over authenticated WiFi ADB on every new boot ID, 50 out of 50. Mean time from reboot command to that check was 150.7 seconds (range 147.3–154.3 s), almost all of it Android starting up and getting on the network, not the exploit itself. A factory reset wipes the app and helper, so you'd have to repeat the BootROM stage to set the whole thing up again.
Making the root useful
The BootROM flaw is burned into silicon, but the Binder bug isn't. One software update could quietly close the only route that brings root back after a normal boot. So the Echo is configured to start with WiFi off, and once the kernel exploit has root, the helper installs network restrictions before bringing WiFi up. In our cold-boot tests, the filters were already in place by the time the device was online.
But the whole point was the application layer. Kiosk Satellite connects the Plus 2 to Home Assistant, and Music Assistant handles Spotify. Codex and I wired up the physical buttons, the microphone permission, and the LED ring (the stock audio processor even tells us the direction of arrival the ring should show), and our helper restores RECORD_AUDIO whenever Fire OS revokes it. All of it runs through the stock audio stack, as we never had to write a single replacement driver.
Here's the finished assistant in use:
We're still booting Amazon's signed kernel and Android, and LK still checks the boot image. Root lets us reshape the running system, not swap it out. This chain has never booted a replacement kernel or a different distribution.
Looking back
Kamakiri gave powerful but fleeting control at the very start of boot. An installed app gave weak but permanent code execution once Android was up. The Binder bug is the bridge between the two: it let that app earn root back on its own, every cold boot. In the USB-free power cycle, the signed stock system and the voice assistant I'd chosen both came back without me touching a thing.
The build date is the part I still find strange. My unit runs a kernel compiled in October 2026, reporting a March 2026 patch level, and its Binder path is missing the fix from the October 2019 Android bulletin. A seven-year-old, publicly documented, once-exploited-in-the-wild bug, alive on an older device running a 2026 vendor build. I don't know why it's still there.
The two bugs that made this possible, the BootROM flaw and the Binder use-after-free, were found by other researchers. What I actually did was narrower: I chose the device, found and measured its USB pads, and steered the search back onto solid ground when the early-boot path turned into a dead end. Codex did the rest of the hard part. It wrote the RAM bridge, adapted a Pixel exploit to a kernel it had never seen, diffed the captured image against public patches, and helped me stitch the voice stack together. The smart plug and a soldered USB cable gave it something an agent usually doesn't have: a body. It could try an idea, break the device, and try again, all on its own, overnight.
I keep coming back to how much of the reverse engineering it simply handled. But it didn't make me redundant. It moved the bottleneck. Someone still had to decide which question to ask next, to notice when a claim didn't match the hardware, to call off the LK hunt before it ate another week of compute. So for now, the scarce skill isn't doing the work. It's understanding the problem well enough to aim the agent at the right part of it. You still need a feel for the system and for the different angles of attack. The upside is that you can build that feel with the agent: I learned a lot of this kernel's internals by arguing about them with Codex when I was trying to understand the details. And the thing agents are unreasonably good at is the grind: testing ideas, iterating fast, and making progress while you sleep.
On cost, I got lucky. I had US$500 of OpenAI compute credit lying around and burned maybe US$200 of it, though I was running other experiments at the same time and can't cleanly separate the bill. I doubt I could have built this exact chain by hand even with much more time. A less directed agent might have stumbled onto the same route eventually, but probably at many times the compute. Giving it a clear goal and a reliable way to test its own ideas is what made it practical.
I'm not going to keep developing this jailbreak forever. I might poke at other old hardware, and I'd love for someone to make the voice integration easier to install and live with. Mostly, though, I just wanted an old speaker to run an assistant I chose, instead of one chosen for me. Now it does.